
Hey everyone! This page is specifically for all of the other artsy things I like doing. I will just be putting up pictures with some brief explanations and I might have some mini tutorials on certain projects. As always, if there are any questions or concerns about anything that is posted, feel free to comment below or send an email to lettherebepolish@gmail.com
<><><>


<><><>
I took a ceramics course in college and for our final project, we had to use more than one technique we had learned and come up with something that was complex. I have been playing the violin since I was 10 so I decided to make an electric violin!

This was especially hard to make because I knew some of the pieces would end up warping in the oven and I also had to make sure that the holes for the strings wouldn't shrink too much because then I wouldn't be able to fit the metal strings through. It all worked out in the end! (Fyi, I took the picture at the workshop so the lighting was horrible. It definitely doesn't look as yellow as it does in the picture.)
The glazing took almost the same amount of time as actually constructing the piece. I used painting glazes because there was no way I could dip glaze this. It's nearly 3 feet long! Along with the black and brown painting glazes, I used a gunmetal glaze on parts of the base and used textured alligator glaze for the other parts of the base. I think the effect looks awesome and works well contrasting the simple black!
<><><>
I know a lot of people carve pumpkins, but this was my first time carving one! I didn't even do most of the work.

My role in this pumpkin was basically taking all the gunk out from the inside and drawing the face. My friend ended up doing the actual cutting because I couldn't do it. But I'm happy with how it turned out considering it was the first time both of us did this!
<><><>
This was my first attempt at making something from Pinterest. Melted crayon art! My friend and I both decided to do this together and we ended up going to the dollar store to get our supplies. We got the flowers and crayons from there.

This was SO hard to make. I saw a lot of tutorials on how to do this properly and I honestly think that the reason mine was so much harder was because of the off brand crayons. They were melting at different rates and some of them actually wouldn't even melt no matter how long we aimed the hairdryer at it. I'm pretty sure that Crayola crayons or Roseart crayons would provide better results. I still think this pretty cool though.
<><><>
I used to paint when I was younger. And by used to paint I mean in art class with water colors. But I did draw an enormous amount. My family received an aum painting from a friend as a gift, and the colors only allowed us to hang the painting in our living room. But the painting was somewhat small and looked awkward all by itself. So I decided to paint a drawing and see how it would look standing with the other painting.

I couldn't just draw a Ganesh and leave it at that because then the background would be white and that didn't go with the color scheme of the room. So I got some acrylic paints, brushes, and a canvas and went at it. I was thoroughly surprised at the result and am really proud with how the final product turned out. I will definitely be painting some more in the future!
<><><>
I told you I would be painting again! My friend loved my painting from above and asked me to make a huge painting to above the fireplace. We went with 4 separate canvases and I made one giant painting with all of them.

I went with acrylic paints again and used colors that matched the color scheme in the living room. There were only warm colors so I tried to have warm maroons, oranges, browns, reds, golds, etc. to make the piece fit perfectly. The couches in the living room were cream so I stayed away from that color to make the painting pop a bit more.
Here is what the painting looked like after it was mounted:

I'm so happy with this painting and absolutely love it!! It has such a nice warm feel to it. Don't you think?
<><><>
It seems like I've been on a painting spree! I have another painting for you. This one was also for my friend and was made using acrylic paints. My friend wanted either a Ganesh painting or an aum painting. So I thought of combining them both!

This one got a little messed up because the silver paint was drying quickly so I ended up rushing in creating the lines. The trunk part of Ganesh could have been better formed but I still like the overall look of it as long as I don't focus on one part for too long.
<><><>
My friend that made the melted crayon art with me wanted to do another project so we decided to make dream catchers! We found tutorials online and we both ended up making completely different looking catchers. Mine had a lot of busy work going on and hers was more simple than mine.

I have a four poster bed so the catcher fits perfectly atop one of the posts. I think the hardest part with this was trying to figure out how to get the feathers to stick. But it all worked out in the end!
<><><>
I have another pottery project for you! I had taken a pottery wheel class a while back and ended up making mugs. They were fairly easy to make after I got the hang of it. The tougher part was coming up with an overall shape and then coming up with the design of the handle that would fit the shape.

I made 2 mugs. One of them was a little more curvy with smooth transitions and a flowing handle. The other was more rectangular/boxy with a straighter edges and an unnatural handle. Both of the mugs fired beautifully because there was no awkward warping and the the handles kept their shapes. The mugs were then glazed using a dip shine glaze. I think the coat was more even on the curvy one than the boxy one because there are some spots on the boxy one that don't have the shine.
<><><>
What's next? More paintings of course! Here I have some henna paintings. Basically it's just a henna design that's much thicker and on a canvas. I decided to make them the colors of my room so that I could put them on one of my bare walls.

Again, I used acrylic paints! My room is all black, gold, and red so these went perfectly. I even tried to have it so that there was one background color, one highlight color, and one accent color on each of the canvases (Background-black; highlight-gold; accent-red). This way I used the three colors on the canvases each time! I'm so happy with this. I still get giddy every time I see these because as I was making them, I thought they were going to fail badly. But they're a success!!
<><><>
Here's a painting that I made for my physical therapist's clinic. I was so ecstatic that I could walk again after my knee surgery so I thought of giving the clinic a painting of a dancing figure. I tried to make it so that the background colors fit the colors of the clinic and I think they ended up working nicely!

There might have been a better way to make the dancing figure but I couldn't think of another way while I was making it. I think if I had made the figure using rough strokes, it would have looked better. But this still looks nice! And it ended up fitting in the clinic nicely.
<><><>
When I went to get the canvas for the previous painting, I saw a sale for some mini canvases and they were so adorable that I just had to get them. I wasn't sure what to do with them but then I figured it out! I just had enough to go with the letters of my name. I have a little vanity in my room and the space above was empty so the canvases would fit there perfectly.

These are six little 2x2 canvases and I used the same color scheme as the henna paintings but I added the silver touch in there to have more color. I arranged them so that they are above the mirror on my vanity and they're not touching each other. They are also slightly arched, matching the shape of the mirror. I like how these turned out! Although I do wish that I made the stem of the "h" a little bigger. They're still very cute.
<><><>
I have another Pinterest-inspired project for you all!! I saw a post on Pinterest that created a very simple piece of art with white puffy paint and a white canvas. Basically, you just create simple designs with the puffy paint on the canvas and then leave it at that. I wanted to see how it would look with paint over it and some stud stickers.

The puffy paint was really hard to control and I even tried using a hot glue gun to create the maroon "squiggles". But that was even harder to control! I still like it as a first attempt and now know that I was too ambitious with this project. I should have kept it simple. Although I do love that I added the studs because the painting in general looked too dull without them.
<><><>
This next project is indeed another painting. My friend wanted me to make him a painting for his birthday. And since he's a DJ, a painting with something related to music seemed to be the way to go. I'm not too happy with the end result in the sense that it doesn't look like what I had in mind. But it still looks decent.
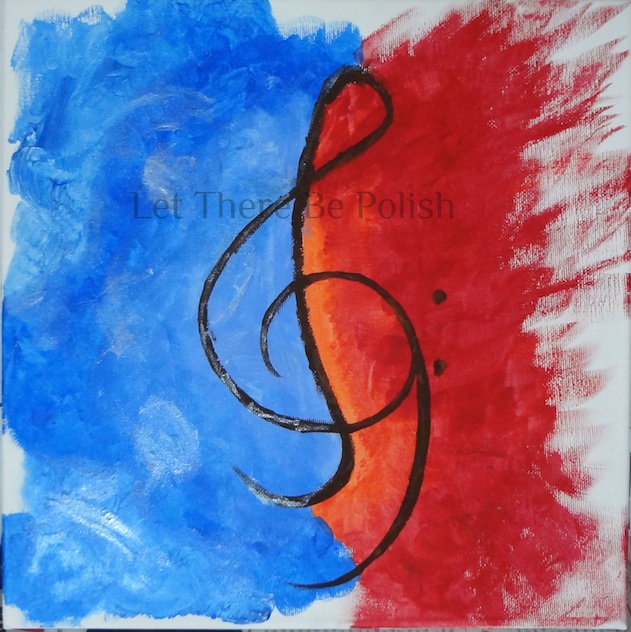
What I was trying to go for here was have one side of the painting showing water and the other side showing fire. I tried to make that happen but couldn't figure out how to do it. Probably because I have never taken any painting classes. The treble and bass clefs are in brown and I added some of the "water paint" and the "fire paint" on top of the clefs. In my opinion, it's decent, but I should have figured out a way to do this before I actually did it.
<><><>
Baking!! Oh I love to bake and trying out new recipes. I have an amazing, healthy recipe for all of you. Of course, I found this one on Pinterest and had to try it out right away! Everyone that tried it loved it so I know I will be making this again sometime soon. The best part about this bread is that it doesn't taste healthy! So you feel like you're indulging!


Ingredients:
4 Tbsp butter
4 Tbsp unsweetened applesauce
1 cup sugar
3 large eggs
1 1/2 cups all-purpose flour
1/2 tsp. salt
1/8 tsp. baking soda
1/2 cup fat-free plain yogurt
1 cup shredded zucchini
1 Tbsp lemon zest
2 tsp. poppy seeds
Directions:
Preheat
oven to 325 degrees F. Mix butter and applesauce. Add sugar and eggs, beating until it is all thoroughly mixed.
In
a separate bowl, stir together flour, salt and baking soda. Add to
butter mixture and mix thoroughly. Then add in the yogurt and mix. Stir in shredded zucchini, lemon zest and poppy seeds. Spoon batter
into 3 greased 5 x 3-inch loaf pans (I used disposable aluminum ones)
about 1 1/3 cups batter per pan.
Bake for 45 minutes or until a wooden pick inserted in the center
comes out clean. Let cool for about 10 minutes and then remove bread from pans. Enjoy!
<><><>
Cheesecake!!! Who doesn't like cheesecake? Well, actually, my mom doesn't but that's besides the point. I made chocolate truffle cheesecake! And it is oh so good!! I've made it several times but I was compelled to make it this week. If you love chocolate and cheesecake, then my recipe is for you.

Ingredients:
9 inch spring-form pan
Crust:
1 1/2 cups chocolate wafer crumbs
2 tbsp granulated sugar
1/4 cup butter, melted
Filling:
1/4 cup semisweet chocolate chips
1/4 cup heavy cream
3 (8 ounce) packages cream cheese, softened
1/3 cup unsweetened baking cocoa
3 large eggs
1 tsp vanilla extract
1 cup sugar
Topping:
1 1/2 cups semisweet chocolate chips
1/4 cup heavy cream
1 tsp vanilla extract
Directions:
1. Preheat oven to 350 degrees
2. In a small bowl, combine cookie crumbs, sugar, and butter. Press onto the bottom and 1 1/2 inches up the sides of a greased 9 inch spring-form pan. Bake at 350 degrees for 12 minutes. Cool on a wire rack. Reduce heat to 325 degrees.
3. In a saucepan, melt chocolate chips; stir until smooth. Remove from the heat, add cream, and mix. Set aside.
4. In a mixing bowl, mix cream cheese and sugar. Add cocoa and mix. Add eggs; beat on low just until combined. Stir in vanilla and reserved chocolate mixture just until blended. Pour over crust. Bake for 45-50 minutes or until center is almost set.
5. For topping, melt chocolate chips in a saucepan. Remove from the heat. Stir in cream and vanilla; mix well. Spread over filling; refrigerate overnight. Carefully run a knife around edge of pan to loosen. Remove sides of pan. Just before serving, garnish with whipped cream, if desired.
Hope you all like it! If you end up trying out the recipe, let me know how it turns out!!
<><><>
No comments:
Post a Comment